batcat and catbatt

Whenever I groom my cats, unless the bin is right next to me to throw away the fur, I find myself spinning it with my fingers, then twisting it up and plying it back on itself, over and over until i have a short thick length. Which i then throw to the nearest cat who plays with it excitedly. Oh, except that one time that i wrapped some wire round it and Gren and Wormy played around with creepy cat fur handlebar moustaches. So a while ago I decided I wanted to spin some proper yarn out of cat fur, so i could knit it into a cat toy. I mentioned this wish to my dad, and he started collecting the fur from his cats.

Last week he remembered to give me his collection. 26g of it. It’s been kept in a plastic baggie, so it was pretty compressed in the photo, but trust me, that’s a LOT of cat fur.

catfur

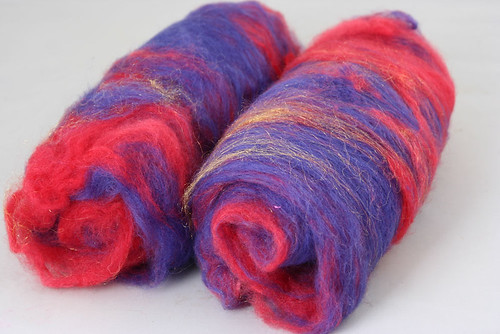
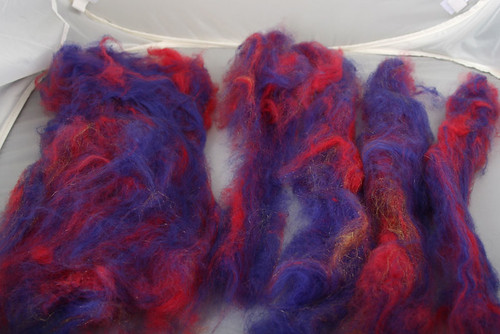
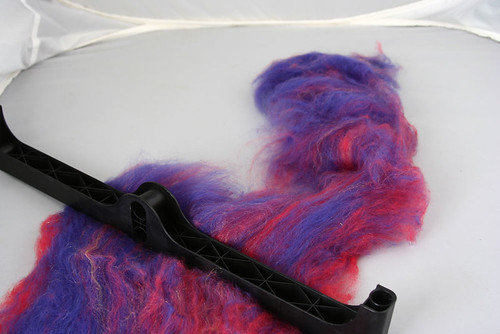
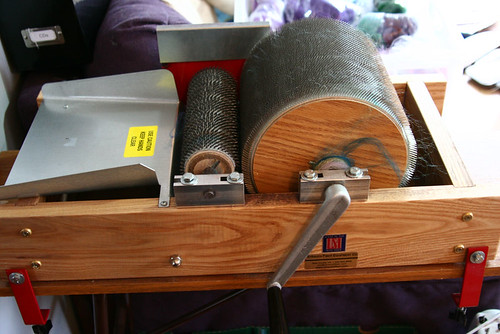
I didn’t want to spin it on its own because the ends seemed a little spikey, and it wouldn’t make a very good yarn anyway, as it’s got no crimp, so I decided to blend it about 50:50 with wool, and ended up choosing some humbug BFL that was similar colours. I made a few rolags before I realised I don’t particularly like hand carding, so did the rest on the drum carder. After 3 passes it was pretty evenly blended. Another couple would probably have made it super smooth, but I don’t mind if it’s a bit lumpy and bumpy.

catbatt

I decided that there is way too much there for just a silly toy mouse or something, so I’m instead going to make a stuffed toy kitty as a present for my dad. Hopefully he’ll appreciate it as something to remember the kitty who contributed most of the fur by, as she died a few months ago, rather than thinking ‘ew gross’.

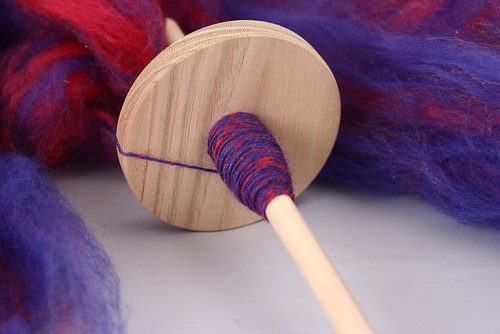
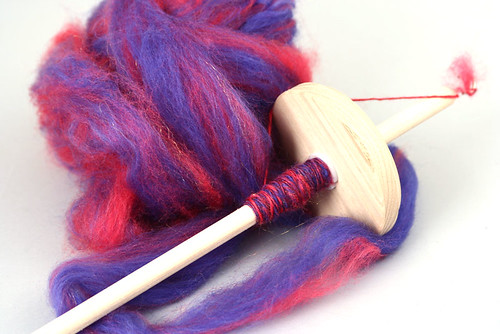
I am going to wheel spin most of it, but I was feeling too tired to sit at the wheel tonight, so I spindle spun a little of it in bed. It’s actually surprisingly soft and the spiky ends of the fibres aren’t as noticeable when spun, though this may well change when it’s plied.

catyarn

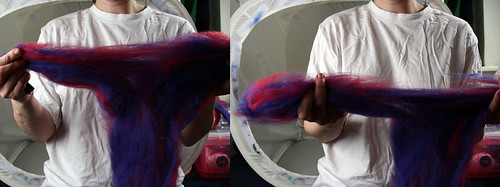
It’s not the nicest or most fun thing I’ve ever spun, but it’s not difficult, and it’s certainly interesting. Turtle finds it especially interesting; while i was carding the rolags she came and put her head in the bowl of fibre and was sniffing really deeply with her mouth open. After making a handful of rolags I realised I needed a nap, and later this evening gren noticed one of the rolags was a little messed up and sitting at the end of my bed, so she must have liked it so much she stole it to play with.

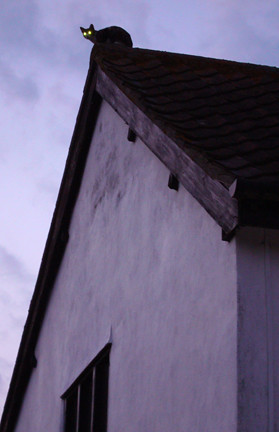
Aaaaaand now, batcat! Completely unrelated to the above, but it made for an awesome title, and I like this pic so I’m going to share.

Turtle’s brother lives with my parents. He has learned that they have bats living in their roof. He has also learned that if he sits really quietly on  the roof at dusk, he can hear them coming and catch them as they fly out. It’s really fucking high, I have no idea how he manages to get up there, but he’s super cute. There was a period of about a week when he brought them a dead bat every single night, but I think he’s got bored of that now, which is good, cos bats are so awesome and soft and cute, and don’t deserve to be nommed by naughty cats.

batcat

Even more unrelated to the above, I read a thread on LSG earlier that was talking about disgusting things found in kitchen cabinets, and I remembered that there was a jar of ‘seafood salad’ in my fridge that Nik had bought for Alice about 5 years ago when she was in her ‘eating gross things and blogging about it’ phase. I bravely opened it (in the garden in case it smelled gross), and these two little cuties were in there. I love mini squids!

squids copy

The wheel spins!

It is pretty and almost finished!

wheelnew1

In this context, ‘almost finished’ means ‘actually works and spins yarn, but still has a buttload of work that needs doing before it looks how i want’.

wheelnew3

I have issues with painted wheels. I LOVE the idea, and then I see pictures from people who’ve just painted random sheep or flowers or cats all over them, and that seems to hurt my brain. I think the design should fit with the shape of the wheel, flow with it, add to it, rather than look like a child had stuck stickers all over it. I am well aware that I may be alone in my thinking, and this isn’t a slight at all on people who DO like that sort of thing, but well, i think most painted wheels look ugly. Yet still the idea appeals to me.

I am pretty happy with how this is coming along, it looks all pretty and old and….argh i don’t wanna say it….goddammit, ok, i’ll say it….steampunkish* and certainly much better than the orangey varnished thing it started out as.

And it actually makes yarn, see?

wheelnew2

Okay, so i didn’t make MUCH yarn because the flyer only has two hooks on and the band only fitted onto the biggest whorl, and there’s a bit of a wobble on the wheel as i couldn’t put the pin back in (don’t worry, it wasn’t another huge drama, just Gren is stupid and thinks 1am is the time to be asleep, so hitting things with hammers wasn’t polite). But it made yarn nonetheless, and it actually spun amazingly smoothly and quietly considering it has the old solid wooden bobbins.

Now all i need to do is:

– hit it with a hammer!

– replace flyer hooks with pretty new shiny ones

– replace driveband with one of the cool stretchy ones (which i have somewhere, just need to find)

– replace tension spring with one that isn’t all fucked up, and replace the cord with something less irritating than that stupid monofilament crap it comes with.

– replace head of tension screw and mother-of-all-lifty-thingy-screw with pretty brass ones

– do something with the treadle assembly. Probably a brass plate to cover the treadle, or maybe a couple of brass rods. My abilities (or lack thereof) in remembering to buy things, finding things locally so i dont have to waste a ton on postage, welding, and actually getting on with stuff will all come into play here. I may well just end up painting it with the pretty brass paint and calling it a day.

– make a matching orifice hook

– decide whether to do anything with the bobbins and lazy kate, or just not bother seeing as the bobbins are the old solid wooden ones and could do with being replaced with the ones with plastic bearings anyway.

*omg i hate the word steampunk. I LOVE the aesthetic, but I hate the whole ‘imma stick some bits out of a clock on this piece of plastic crap and then sell it as a steampunk pendant’ shit that seems to be prevalent these days. It makes me cry emo tears, so even using the word with -ish at the end makes me feel dirty. *shudder*. I will have to go look at regretsy for a while until i feel clean again. Hmm, on second thoughts, that totally won’t work, but i will go look anyway because it is hilarious.

How to spin coils, an almost-tutorial

This is a lazy post. I keep thinking I should write more tutorials, but then I lack the motivation and extra hands to take step by step photos, so I just post vast swathes of text on rav, and the next time someone asks the same question I end up hunting through my previous posts. This is beyond tedious, as I have over 20,000 posts, most of which are completely stupid, and contain words and phrases such as ‘zombie apocalypse’, ‘sandy vagina’ *, ‘mmmm boobs’, and ‘fucking cat, imma kill her’. They probably weren’t that interesting or amusing the first time round, and they are even less so the second time, so even using rav’s awesome search, it becomes hard work.

Today, someone asked a question about spinning coils, and i provided a suitably verbose answer, so I decided to paste it all here, partly so I can refer people straight to this post without having to search my history, and partly so I can link unsuspecting people to a blog post that contains the word ‘vagina’ several times.

The first thing to note is that there are two types of yarn that are referred to as coils.

coils1

coils2

The first pic is what most people mean when they talk about coils, it’s just a normal 2 ply yarn with the odd coiled bit in. The second is referred to in the spin-off article mentioned above (Winter 2009 edition) as ‘supercoils’. They both use similar, but slightly different techniques.

Yarn 1
For this type of yarn you want to spin 2 singles from the same fibre. The singles need to have a LOT of twist, far more than if you were going to make a normal balanced 2 ply. I didn’t use enough twist on mine, so its not as tight as i’d have liked. Slightly thick and thin singles are good for this as the thinner areas help the coils to ‘grip’ better rather than stretching out and sliding around, but big fat lumps should be avoided if possible as they don’t look so pretty if they are on the coiling single, and will make the yarn fall apart if they are on the static one.
– When you get to plying, use a low-medium ratio, and a moderate take-up
– position one bobbin to either side of your body. In an ideal world they would both be on tensioned lazy kates to make the crazy amount of singles twist easier to deal with, but if this isn’t possible, I’m sure you can work something out.
– start off by holding both singles at around a 45 degree angle to straight (this is what i wrote, but i actually meant 45 degree angle to each other, either side of straight. So  a 22.5 degree angle to straight i suppose. Clear? no? well just spin a 2 ply for a bit and ignore me), and spin a section of standard 2 ply yarn.
– when you want to make a coil, bring your left hand down so the left single makes a straight line to the orifice, and move your right hand up, so the angle between the two is just shy of 90 degrees. Hold the left one tight and allow the right single to wrap round it. When you’ve got enough wraps, let go of the right hand single, and push it up the left one that you are still holding taught. This will make a lumpy coiled section.
– put your hands back to their original positions and spin some more normal 2 ply
– make another coil as above, this time reversiving the jobs of the left and right hands
– repeat until you are done and marvel at your awesomeness
This method of changing which singles stays straight and which one wraps means you should end up with a balanced yarn, and that if your singles are of the same length, you won’t end up with too much of one left over.

Yarn 2

This is the sort of yarn for which you need a different type of core, and you only need one singles to work with. I used the leftovers from my first yarn, but ran it through the wheel again to add more twist, as i knew there was nowhere near enough.

For the core, you want something that is reasonably thin, and very strong. Lots of people like to use crochet cotton, but i prefer something with a bit more grip that’ll hold my coils in place a little better, so i used some silk noil yarn that i had on a cone, i think it was meant for weaving.

When you are spinning this sort of yarn, the core remains static and all the wrapping is done by your pretty singles, which means a lot of twist builds up in the core yarn. You can spin it onto a bobbin first and guess the amount of twist you’ll be taking out to get an even yarn, but i had no idea, and know it’s always more than i thought, so i went with the alternate method of letting the twist out periodically as i was working.

– take your core yarn, and wrap it onto something that can hang freely and untwist while you are spinning. The spin-off article above uses a drop spindle, but that doesn’t work so well for me as it hits on the edge of the sofa/floor as i work. I found a suitable stone in the garden and wrapped several metres of the core around this, then secured it with a couple of half hitches.
– you’ll want to use a similar take up and ratio to the last yarn, or once you get good at pushing the coils up you may want to up the ratio.
– attach both yarns to the leader, hold the core yarn taught in your left hand, and the wrapping yarn in your right hand (with the bobbin on a lazy kate to your right)…or the other way round if you feel more comfortable that way.
– holding the core yarn tight and the wrapping yarn at almost 90 degrees to it to the right, treadle and allow the singles to wrap around the core. When you’ve got a few inches done, stop and push the singles up the core to make a solid wrapped section.
– There will be a fair amount of twist in your core now, so make sure your stone/spindle is hanging freely and can untwist this extra twist on its own….it might need a bit of a helping hand.
– repeat. a lot. alternating between spinning to wrap the yarn on, pushing it up, and releasing twist from the core
– when your spindle/stone is right up near your hand, let a little more core yarn out and keep going.

This yarn takes a long time to spin, and uses a lot of singles for a very small piece of yarn…but it’s so pretty!

I am plotting in my brainmeats a reworking of this post with more pictures to make the instructions more clear, but for the time being, this will have to do.

* in the interests of science, I did a search. I have used the the words ‘sand’ and ‘vagina’ together in 9 of my 20482 posts, and the word ‘vagina’  (or posted in a thread with vagina in the title) in 89 of them. Do you now see why I don’t want to search my post history?

wheel update

I worked on the wheel a little more today. Sanding the single coat of varnish on this was a lot easier than the gazillion layers on the last one, so I didn’t bother getting more paint stripper. I started painting the wheel as I’d planned, and decided to take some pics…and then I realised i very rarely share my WIPs unless they are yarn related….which is kinda stupid. I’m happy being all like ‘hey, see this dead jellyfish with needles poking out of it? well, in several months time, it will be a beautiful lace shawl!’, but when it comes to something i’m painting, i get all ‘noooo, not finished, no-one must seeee’. I do not know the reason why, but to buck this trend, here is the wheel as it currently looks. It needs more coats of paint and a different colour paint and generally just MORE, but its getting there.

wheelbrass

I was initially considering taking the wheel itself apart and using brass rods instead of the spokes, and replacing the treadle with a brass plate (cos it’s plywood, so even with staining it’s not gonna match the rest of the wheel). Then i realised that would be an all-round Terrible Idea, as I am not good enough at precision work on the lathe to be able to get the spokes completly identical, and then attempting to take apart a glued together wheel and get it reassembled so it spins true and doesn’t wobble would probably result in disaster, and the desired end result is mostly to have something that actually spins, as well as looking pretty.

While taking the pics, i realised that newcat was sleeping on the sofa behind, so i got a sneaky shot of her too.

newcat

Also, I was going through some old pics today. The original thinking was to see if an old RAF base i photoed last year would be suitable for a knitting photoshoot, but I have long since forgotten which garment I was considering, or whether it was just a hypothetical future shoot when i’ve actually written up a pattern.

Sadly i couldn’t get as many photos as I wanted, as while we were there a man with a gun came and told us we were trespassing and should leave. I tried the whole ‘but i’m only taking photos, and it’s so prettttty’. He informed me i might get hurt, and didn’t seem to be interested that i didnt care or wouldn’t sue him or anything.

Oh, on rereading that it sounds like we were on a working base…what actually happened is that we went on a weekend, when this long-disused area becomes an airsofter’s paradise, so about an hour into our visit lots of teenage boys in combats appeared running around shooting each other with bb’s.  It wasn’t like I was arguing with someone with a real gun or anything! So next time i return it will be during the week, when hopefully no-one else will be around, cos this place was pretttty, and full of super super cool stuff.

uw5

uw4

uw3

uw2

uw1

eek, no time to proof read, i am late for an appointment killing bad guys on the internetz. if it makes no sense, just guess what i was trying to say, maybe you’ll come up with something much wittier than i managed

procrastination over. kinda.

This morning i realised just how many WIPs I had..mostly fibre related, but a few in other media too. I decided to catalogue them and take pics and post here and try to shame myself into actually getting on with something rather than starting something else. Well, somehow in the time between having this thought in my bedroom, and getting dressed and making it downstairs, I remembered another WIP (which is a very generous title, seeing as I’ve not actually done any W on it at all). So screw cataloguing, it was time to make a mess!

I found this wheel, with lazy kate, 3 bobbins, a niddy noddy (that was so awful I forgot to put it in the picture), and an ‘assortment of spinning books’ at an auction a few months ago. The final price including fees and VAT and whatever was around £40, which was pretty good.

wheel

It was covered in dust, had some wool that had been (badly) spun in the grease on the bobbins, and smelled of mothballs, old lanolin, and despair. Oh, and the leather footman/treadle connector was broken. I thought it was an old Ashford Traditional, but on closer inspection (i.e. reading the label) I noticed it was branded ‘Kit Kraft’, so that means it’s oooold.

Oh, and here’s the ‘assortment of spinning books’ that came with it. I guess 2 out of 5 isn’t bad, though how the cheesemaking one got in there I’m not sure.

books

The reason i was procrastinating was because I was unsure whether to just clean it up and replace the bit of leather, or whether to strip it down completely and restain and paint and oil and all sort of other things. So of course on this day of ending procrastination and getting stuff done I decided to go with the method that would take weeks rather than hours.

As I was unscrewing it, Gren came into the room to talk to me about WoW, and, having got to a rather stiff screw, I shoved the bit at him saying ‘uuuuh’, which I think is the internationally recognised noise for ‘You’re talking and i don’t want to interrupt, but I’m a weak girl and you’re a big strong man, please remove this screw/bottletop/jar lid for me using your awesome powers’. Then he seemed vaguely interested in the whole thing and undid a few more screws until it was time to get the wheel off.

Then the whole thing turned into an old-lady-who-swallowed-a-fly scenario. The axle goes through the wheel, then there is a hole through both in which a long metal pin sits to keep it in place. You need to get a long rod into the hole and hit it with a hammer until the pin slides out. On the newer model traddies this hole is at one edge of the wheel so you can use the hammer without the spokes and wheel rim getting in the way. On this wheel it was right in the centre, so getting something in and hammering was hard enough as it was.  Then I couldn’t even find anything suitable in my tool drawer, and so came back with a strange selection of ‘might do the job’ bits. He tried a long thin rat-tail file. And hammered. A lot. Nothing went anywhere, and then he realised the file was stuck in the metal rod and wouldn’t come out.

Nothing else i’d found was up to the task, so I went out to the garage/workshop and hunted there for more suitable items. I came back with a little jewellers screwdriver and a few nails. At this point Gren showed me that while trying to remove the file he’d broken it off inside the wheel. The shaft of the screwdriver I’d found fitted right inside the metal pin, and the edge of the handle part was the same size as the hole in the wood, so in theory we could put this into the pin from the non-file end and use the screwdriver to push out the pin AND the file.

A couple of minutes of hammering later, and he realised the screwdriver wouldn’t come out. So there was a hole with a pin in the middle, a broken bit of a file sticking out one end, and a screwdriver sticking out the other. At this point he gave up and went to put the kettle on, and I had to take over. I tried some more hitting with a hammer and pulling at the file (that was at least now protuding a bit) with pliers. I was about to hit the file end to try and get the screwdriver out, when Gren came back and said ‘if you hit that it’ll just get more wedged in the pin and make it even worse’. He may have had a point, though it was fast getting hard to see how things could get worse unless fire or velociraptors or crocodiles were involved. He suggested I cut off the protruding bit of file, but having no saw or dremel to hand and not wanting to get up AGAIN, I decided i was going to use the sharp cutty bit on the pliers to dent it enough that I could hit it with a hammer and it would break off (i like hitting things with hammers, ok?). As it was, this plan was awesome, as using that part of the pliers on the rough surface of the file got much better grip than expected, and i pulled the broken bit out.

So, now onto the screwdriver. I hit the pin back the other way until the screwdriver loosened, and then pulled it out. Ok, so we were back where we started, except the pin was actually protruding about an inch from the hub  of the wheel. I got one of the nails I’d found in the garage, put it into the hole and did a little more hitting.

Almost all of the pin was finally visible on the other side!! Oh, yeah, but the nail was stuck, and not long enough to fully push the pin out. I grabbed the pliers and started pulling and twisting. At some point during this part of the process a cup of tea had appeared next to me and Gren had appeared on the sofa opposite me, and he was making grabbing motions, which i think is the internationally recognised hand gesture for ‘you’re a weak girl and I’m a big strong man, it is painful to watch you struggling there using your pathetic muscles, so just let me do it already’. I handed it over and drank my tea, and after a little while of pulling and tugging with the pliers, the pin AND the nail were free.

HA HA WHEEL, WE WON SO SUCK  IT!!!!!!!

The rest of the process was even less interesting, so I will spare the details. I will say that last time I used paint stripper i realised it ate through nitrile gloves. This time i double bagged for safety and realised that the vapours can travel through latex gloves AND washing up gloves and still make your hands burn. Seriously, wtf sort of gloves are you meant to wear with this crap? Then i ran out of paint stripper before all the varnish was gone, but decided to go ahead with staining anyway, figuring it would make it easier to see where the remaining varnish was and i could sand it later. or buy more paint stripper. Actually on most areas the odd bits of remaning varnish just made it look cool and old and stuff, but on the wheel itself it looks crap, so i will have to work on that tomorrow. Or next month. or year.

Anyway, here’s how it looks now. If you can imagine this picture was taken in decent light and wasn’t blurry. Or maybe just take my word for it. It’s brown now.

wheel4

Oh, and if you’ve managed to read all this way, here is your reward. We went on a boat on the broads a while back, and i squeeed a lot as everything had been making babies and they were SO CUTE.

see!!!

IMG_3141
IMG_3085
IMG_3076
IMG_3067

How to spin from batts

I often speak to people who love the look of batts, but are a little indimidated by the idea of turning a rectangular chunk of fibre into yarn, having only previously spun from tops or roving.

A lot of the time, I find spinning from batts as easy, if not easier than using tops…the fibres are a lot fluffier and airer, and minimal effort is required when drafting. For very fine laceweight yarns, tops can be slightly easier, but for all other spinning I love the fluffiness of batts, the fact that you can get an unlimited range of fibre blends, and the fact that they often have pretty sparkle in!

The batts I am working with in this tutorial were carded especially for me by Kristina, who named them ‘Vamp it up’, and they are available in her shop. All other batts pictured were carded by me, and can be found in my shop, or ordered via a custom request if I am out of stock.

batts

There are a few ways to turn these chunks of fibre into yarn:

1) Tearing into strips

Take the batt, and lay it out flat. Most batts made on standard carders will be longer than they are wide, and you will clearly be able to see the ‘grain’ of the fibre running along the length. You will be tearing them into strips along this grain…make the strips as wide or narrow as you want to suit your spinning style.

(I apologise for giving you the finger in the second pic…taking pics of yourself doing fibre stuff in a tiny room while trying to hold the camera remote in your hand is very difficult).

tearingstrips

Here’s half the batt torn into strips, and the other half still intact. This pic is very very messy, normally the strips are a lot smoother and the edges much more even, but doing it with a camera remote in your hand is harder than I thought!

strips

And here’s the start of the spun yarn:

stripsspun

This method is a good one to use for layered batts such as these, where you want to retain all the colours in each layer in the full length of the final yarn.

burning embers contrast batts

It is also useful if you have two similar but non-identical batts, as you can tear them into strips and spin the strips at random to ensure the finished yarn has even colour distribution.

If you wish to create a self-striping yarn, choose a batt like the one below, and spin the strips in colour order so the yarn gently fades through the shades.

choc cherry batt

2) Pulling the batt into a roving

Another way to prepare the batt for spinning is to pull it into a roving. Place your hands on the batt just over a staple length apart, and pull gently until you can feel the fibres give. At the start, the batt is very thick, so you will need to grip it fairly hard, but try not to pull apart too hard or you’ll break it. Work your way up and down the batt a few times, always with your hands the same distance apart, pulling a few centimetres each time to thin the batt out. Here’s a couple of pics…the first was at the start, and as you can see I’m holding on fairly tight. The second is after I’ve worked my way up and down a couple of times, so the fibre has thinned out and needs a more gentle touch.

pulling

And here’s the final roving, after working up and down the length four or five times.

roving

Finally, the spun yarn.

rovingspun

With the batts I’m using here, there is little difference in the finished yarn with the two above methods, as the colours are evenly distributed throughout the yarn just as they were in the original batts. However, if you have a batt with uneven colour distribution like the one below, this is a good way to get all the shades present into all the yarn.

forest fire batts

If I’d have wanted a stripey yarn, i could have torn these batts into strips as above, but I wanted a more even blend with just the odd highlight of the bright colours, so I pulled them into roving before spinning, to make this yarn.

forest fire yarn
If you prefer a more even thickness roving than you can make this way, then you can use a diz. Thin the fibre out as above until it’s around twice the desired thickness, then gently pull it through a diz into a strip of roving.


3) Tearing horizontally

It is possible, but more difficult, to tear a batt across the grain, if you would like to spin a more woolen yarn. The easiest way to do this is to lay the batt on a hard, flat surface (so, the bottom of a light tent on a bed is NOT a good idea), and put a hard flat object across it (a ruler is good, but of course I couldn’t find one). While pushing down on the ruler, gently pull on the end of the batt, working your way across, to free the fibres. You’ll need to ensure the ruler is placed at least a staple length from the end of the batt, or the fibres won’t be going anywhere!

horiz

Here is the piece completely removed, and then rolled up so it can be spun like a handcarded rolag.

horiz2

You can use this method on any sort of batt you want, though it suits longdraw spinning the best.

4) Removing layers

It is possible, if you’re careful, to gently separate the layers of a batt and spin them individually. For example, if you wanted to spin a batt like this into a striped yarn:

rainbow batts

You gently pinch the fibres on the top layer of the batt, and slowly lift them away. I don’t have pictures of this as I didn’t think they would show up very well given that I was using blended rather than layered batts, and also because I don’t like doing it very much, as you get little bits of flyaway fibre everywhere.

I tend to only use this method if I have a colour or a fibre in a batt that I wish to remove before spinning the batt. It’s possible to deconstruct a batt this way to make a stripey yarn, but really it’s a lot easier to buy batts that have the stripes running across the width rather than in layers.

5) Other methods

All the other methods I can think of are combinations of the above. For example, you can tear the batt into strips, and then tear these strips horizontally into chunks, if you really want to mix up the colours in a bright and cheerful batt. Or you could pull a layer off and roll it up into a rolag shape if you’d like to spin longdraw. Don’t be afraid to experiment, the first two techniques alone are very versatile and simple, and will hopefully give you some pointers and ideas about how to spin your batts.

Using a drum carder – part 1, the basics

I was asked to write a tutorial on how to use a drum carder. This is a huge topic, so in this first post I will go over the basics. Future posts will cover carding raw fleece, and blending commercially prepped fibres, as well as how to clean your carder.

First, the basics. What is a drum carder?

A drum carder is a machine which is used to prepare fibre for spinning. It has two drums, one small one (sometimes called a licker-in) which helps guide in the fibre, and then a large one, which the fibre ends up wrapped around. When the larger drum is full, the fibre is removed, and the resulting chunk of smooth fibre is called a batt. There are several ways to spin from batts, and I will cover those in future tutorials.

There are several different makes of drum carder, I have a Strauch carder, which can be seen here. I chose the Stauch because it has finer card cloth than the others available, meaning it can be used for carding finer fibres, because the licker in cloth is of a unique design that doesn’t trap the fibre, and because it is chain rather than belt driven, meaning it will hopefully last as long as I do.

My carder (pre-cleaning as I took the pic to use in my cleaning tutorial):

strauch

Tools needed to go with a carder

If your carder doesn’t come with clamps to attach it to the table, then these are a very worthwhile investment to stop it moving around as you card and while you’re removing the batt. Here is a photo of the other tools I use with my carder:

tools

The three on the left came with the carder. They are:

Flick carder. Can be used for opening locks of raw fleece before carding, and also for cleaning the drum. I only use it for the latter, I prefer to open locks on a hand carder laid flat on my knee. To use it to clean the drum, hold it against the large drum while turning the handle the opposite way you’d turn when making batts (normally anticlockwise). Don’t move the flick carder from side to side while the drum is turning, do one rotation of the drum with it in one position, then stop and move it over.

Knuckle saving batt pick. This is used to get the batt off the carder. At one place on the drum there are no teeth. When the carder is full, you use this tool along the toothless part of the carder to separate the fibres, an inch or so at a time, until the batt is no longer joined.

Brush. This small brush looks a little like a nailbrush, and is used for cleaning the licker in drum. Due to the design of the cloth on the Strauch, the drum doesn’t get covered in fibre like some other models, but sari silk and angelina especially seem to want to get trapped on it, so brushing with this brush helps free them.

The other tools are my own, and I find they help considerably with using/cleaning the carder.

Long thin forceps. Even after cleaning the drum with the flick carder, there are sometimes a few stray fibres which remain. These forceps are thin enough to get inbetween the teeth to pick out any fibre left over after cleaning. They are also useful for pulling off any fibres which get wrapped around the axles of the drums. Note that while they are thin, the tips are not sharp, so they don’t damage the cloth.

Large needle. I use this to lift off the fibre from the flick carder after cleaning the drum.

Bristle hairbrush.  I couldn’t afford a carder with a brush attachement, so I run this over the drum between layers to squish down the fibres and enable the carder to take more fibre in one go.

How to use a carder, the basics

Most carders have a tray onto which you place the fibre. As the handle is turned, the licker in drum pulls the fibre in under the drum, and deposits it on the larger drum. The large drum turns faster than the smaller one (mine turns 5 times faster), so the fibres are pulled apart as they are deposited onto the drum, smoothing them out.

Here are a few tips which will help you get the best from your carder:

– Don’t put too much fibre into the feed tray at once. You should just be able to see the tray through the fibre. If you put too much on the handle will be hard to turn and the fibres may tear or get caught between the drums. If you are carding commerically prepped roving, you can use as long a length of roving as you like, just make sure the piece is thin enough that the carder runs smoothly.

– Guide the fibre in with your hand. Place your hand on top of the fibre in the feed tray and gently hold it in place, moving your hand as the carder pulls it in. Don’t pull back on the fibre, this will encourage it to wrap around the smaller drum, instead just gently guide it to keep it pulling in smoothly.

– Turn the handle slowly. After a little use you will be able to feel how fast you can turn it and still have the fibres deposited smoothly on the drum. Turning it too fast will be harder work, and may rip the fibres, causing nepps (lumps) in your batt.

– If your carder doesn’t have a brush attachment, get a bristle hairbrush and run this over the drum while turning it between layers. This will help compress the fibre and allow you to get more on the drum. This is especially useful with very fine fibres like angora, which want to fly away all over the place and don’t embed into the teeth on the drum easily by themselves.

– Don’t allow the fibre to ‘fall off’ the edge of the large drum and wrap around the axles or anywhere else on the carder, as this may damage it. It happens to everyone sometimes, but try and move the fibre as soon as it starts to do this, and pull it off the axle immediately.

– When removing the batt, use your doffing tool (or batt pick, or whatever your one is called) to free up just an inch or so of fibres at a time, if you try to do too much you’ll find it very difficult, and you may rip the fibres. Once the batt is separated, take the end furthest from the small drum, and roll the batt up, keeping your hands close to the drum so more of the stray fibres are kept within the batt. The drum will move by itself as you carry on rolling, until your batt is freed.

That is all I can think of at the moment, if you have any questions, please leave a comment and I will update with answers.

Longdraw for beginners

I’ve just realised I’ve been neglecting my blog a little recently. I keep thinking of things to write about, then I write them on a forum on ravelry and don’t put them on here. I just spent half an hour typing up a post about longdraw, so I thought i would share it here.

Firstly, some of you may be asking what is longdraw? Well, it’s a drafting technique which, when used with rolags, allows you to produce a woollen yarn. Not ‘woollen’ as in ‘made from wool’, but woollen meaning a light and airy yarn which combines the long and short fibres from a fleece, wrapped round a core of air, making for a fluffy, bouncy, lofty yarn. This technique can be used for spinning other types of prep making a technically semi-woolen yarn, but with the same fluffy properties (though only spinning from rolags will give you the air core).

The technique relies on one of the properties of yarn (well, of any thread), that is, that twist will build up in thin areas, leaving the thicker areas untwisted. As you pull back, the twist holds together the thin areas, and thins out the thicker areas so you end up with an even single. This is why using a good prep is essential; if the fibres are long and running parallel to the yarn, some fibres from the thick areas will get trapped in the thinner areas and your lumps will be ‘locked’ in place. With a rolag, the fibres are running perpendicular to the length of the yarn, they will be pulled diagonally as you draft, so they overlap and the yarn doesn’t disintegrate, but the end result will be fibres that travel in a corkscrew path along the length of the yarn, rather than fibres all aligned straight and parallel twisted around each other. This method allows very short stapled fibres such as cashmere to be spun with ease, where a short forward draft would be difficult and time consuming.

These tips are aimed for people looking to try longdraw who have never done it before, they are just a few small things I found helpful when first starting. This isn’t a technique I’d recommend for beginning spinners, short forward draws are a lot easier to learn and do from commercially prepped tops/roving, which are easily available. Of course, in the past when using a great wheel, and in countries where cotton is the only available fibre for beginners, people did/do start off with a longdraw method (though maybe great wheel spinners started on spindles?), and they cope just fine, but given the tools and fibre preps available to us today, complete beginners will probably find themselves making yarn a lot more quickly and easily using another technique. This post is designed to help more experienced spinners who are comfortable with spinning and know their way around their wheel, but who want to add the longdraw technique to their spinning arsenal.

– First, pick your fibre. It’s possible to do longdraw from almost anything, but the easiest to start off with is well carded rolags of a medium fineness, medium staple (around 3 inches), nicely sproingy wool. I think my first longdraw was done using rolags from a jacob fleece, but i might have forgotten something else I used. Either way, airy preps like rolags or batts are a lot easier than roving.

– attach the fibre to your leader and spin the first foot or so using whatever drafting style you’re comfortable with. While it is possible to longdraw right from the start, when you’re first starting it’s harder to get this join right, and set the thickness of the yarn you want…starting from a patch of ready spun yarn is easier.

– You want your tension to be just high enough that it winds the yarn on quickly when you let it, but low enough that it doesn’t try and pull the yarn out of your hands. A higher ratio than you’d normally use for the particular thickness of yarn is desirable, but not essential, if your wheel only has one ratio, you can just treadle more before and after the draft to make up for it.

– start off holding your rolag with a few inches of ready spun yarn in front of the orifice, this will hold some twist and allow it to be redistributed throughout the part you draft.

– with your back hand (in my case, my left), pinch off a bit of your rolag. The exact amount will depend on the thickness of yarn you’re wanting to spin, but an inch or two is normally plenty…err on the side of too little at the start….too little and your drafting length will be shortened, too much and you’ll need a magic extendable arm to pull the fibres out long enough. Unless you have such a magic arm, the result will be that your yarn is very lumpy.

– Use the thumb and first finger of your front hand to hold the yarn just in front of the orifice. It’s this that you’ll be pulling back against. If you’ve built up enough twist in the few inches of already drafted yarn, this hand can stay in place until the end of the draft, but chances are you’ll have to open your fingers a couple of times during the draft to allow more twist in to hold the yarn together.

– pull back with your back hand, it’s a fast draft compared to short draw, but it isn’t THAT fast a movement, it should be fluid. Watch the yarn. You’ll see it break into big lumps held together by thinner areas. If you’ve got enough twist there, continuing to pull back will smooth out the lumps, leaving the thin areas as they are. If you see the yarn start to drift apart due to lack of twist, allow some more in with your front hand. Keep pulling back until there are no more thick spots (the yarn won’t be totally even, so don’t worry too much, most unevenness will come out in the plying).

– wait, and treadle. This is a long draft in a short period of time, you’ll need to treadle for a while to make up for it and get enough twist into the yarn before allowing it to wind on. Using a fibre of varigated colour makes this part easier as you can see the angle of twist so you won’t need to be stopping to check plybacks all the time. After a while you’ll get into a routine and know how many treadles you do while drafting, and how many to do afterwards.

– Pay attention to the feel of the yarn with your back hand. It’s reaaaaaally hard to explain, but once you’ve got it, you’ll be going by feel, it feels almost like you’re pulling on a piece of elastic. The feeling is probably the most important thing in terms of setting your drafting speed, and the hardest to explain.

That’s all i can think of at the moment…I hope it helps. If your computer is up to it, watch a few youtube videos to see different people’s styles…this vid is good cos you can see exactly what both her hands are doing: http://uk.youtube.com/watch?v=z92IpGYh8RE.

Be aware that the american and english longdraw are different…both are still longdraw, they both involve drafting way more than the staple length of fibre, but there are slight differences in what your hands do….which are explained in this post: http://spinningspiderjenny.blogspot.com/2006/11/drafting-…. What I’ve explained above is the english longdraw, personally I find the american unsupported longdraw the most fun cos i can do it one handed, but its a little fiddlier to do cos I find you need to mess with your tension a little more to get it right, and its harder to explain as a step by step process, as it relies on how the yarn feels even more so than the english version.

I hope this helps some of you on your path to longdraw fun, and if anyone reading this (does anyone actually read this??) has any questions, just ask in the comments and I’ll answer in a later post.


more batts and spinning

I missed spinning, so I put the wheel back together. It is almost how i want it to look…the wheel itself hasn’t been completely stripped of varnish, but all the rest has, and I’ve stained it, and it’s looking a lot better….just gotta get round to doing the wheel at some point, but until then at least i get to use it. I’ve been spinning a lovely batt in shades of red merino with added silk and sparkle, it’s sooo soft and yummy.

I’ve also added a few more batts to the shop, and I’m planning to add some pretty beaded orifice hooks as soon as I get a chance to photograph them.

As ever, click the pic for a closer look.
newbatts4.jpg

Win fibre/yarn!…and support a good cause

A friend’s mother recently passed away from cancer, and her brave sister is doing a skydive to raise money for charity. If you are kind enough to donate £2, or whatever you can afford, to sponsor her and help her reach her target of £1000, you will be entered into a prize draw to win fluffy fibre and yarn. I have donated a custom carded batt in the winner’s choice of colours, or if the winner isn’t a spinner, I will dye them 100g of sock yarn, again in their choice of colours. Lots of other people have donated prizes too. To be in with a chance of winning, and to see details of the prizes on offer, see her blog post here, and donate as much as you can afford. Thank you!