A year of weaving

A year ago, I ordered my Saori loom and decided to try and learn to weave properly. I decided it was about time I had a look back at what I’ve played with over the last year.

These first two scarves were done on the Ashford knitter’s loom while waiting for the Saori loom to arrive. Two skeins of Wollmeise and a little handspun. One sett at 10 epi, the other at 12.5

IMG_8704

IMG_8762

Then the Saori loom arrived, woohoo! I immediately threaded the pre-wound warp that came with it, and wove and sewed this:

P1080515

As soon as that was off the loom, I put the 4 harness kit on, and immediately put another warp on for a twill gamp and some tea towels, and started weaving. I did a little on it in March and April, and then it sat. And sat. I don’t really know why I didn’t work on it, I was busy with other things and of course dealing with health stuff, but that’s not really the reason, I guess I just didn’t feel motivated. Whatever the reason, I didn’t touch the loom again until November, when I took off the twill gamp:

P1090865

And a couple of teatowels:

P1090869

Once that was finished with, my motivation returned, and I tried out waffle weave on a set of facecloths:

P1090924

Then tried some twill with a fine warp and heavy weft to make these teatowels and an apron. I really like the fabric this makes, and it weaves up so fast. (oh, and there’s a waffle weave cloth there that was the end of the warp, it uses the same threading as for the twill, just a different tie up)

P1100001

P1100011

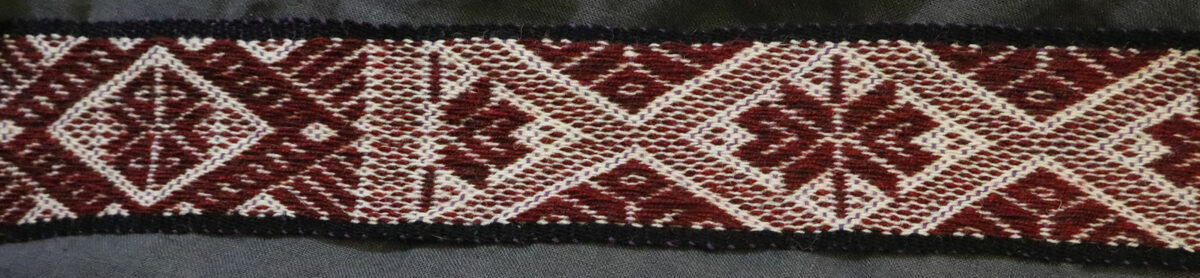
Then I decided to try something a little harder. A scarf in a fine yarn with a more complicated draft, which I made a little harder by adding borders and short top and bottom sections. While at the time it seemed to be slow going, it was still hundreds of times faster than knitting a scarf in fine yarn:

P1090940

Next up was another more complicated draft, my first attempt at overshot. I did enough to make a couple of project bags:

IMG_8914
IMG_8915

I then went for something simpler and faster, a scarf from sock yarn scraps

IMG_8928

Working with sock yarn made me want to use some of my lovely Wollmeise stash, so I then wove this very simple wrap using WM as the warp, and a laceweight wool as the weft:

IMG_8935

Finally, I decided I wanted to make a towel for my hair. Having hip-length hair means I need to use a bath sheet sized towel to dry it, but regular terrycloth towels are so bulky and heavy they fall off at the slightest movement, and hurt my neck. So I decided to weave something much thinner. However the loom is only 60cm wide, so I needed to learn how to do doubleweave. It wasn’t actually that hard to figure out, and I made a towel that works perfectly. The fabric at the fold line is a little dense, but you can’t really tell from a distance:

IMG_8995

Oh, and it seemed a shame to waste the end of that warp, so I wove a warp faced teatowel:

IMG_8984

Phew! that is 2016 in weaving. For 2017 I already have planned a couple of long yardage projects for making clothing, and I want to try crackle and some more overshot.

First Saori piece

My WX60 arrived! I ordered it from The Saori Shed in Diss, which fortunately for me is only 20 minutes down the road. It’s in a really nice building and is a fun place to visit and try out Saori weaving for a couple of hours…which is what I did the summer before last, and why I decided to get one of these looms! Unfortunately I wasn’t feeling well when it arrived, but my mum is awesome and went to pick it up for me.

Out of the box it looked like this:

P1080351

Putting the other bits on wasn’t hard, the instructions were pretty clear. I can’t actually remember everything I did, but I think it was just putting in the back warp roller, the harnesses and reed, the shelf, and the bobbin winder. I just needed a screwdriver for the shelf, and a hammer for the bobbin winder. Nice and simple. And because it came ready warped, it wasn’t long at all before it was ready to go!

And yes, my helpful helper also likes helping with weaving:

P1080380

The warp that came with it was 6 metres x 150 threads of black cotton. This is 30cm wide on the loom. I figured with that much fabric I should be able to make a garment, so I picked a bunch of coordinating colours and got to weaving.

P1080369

The initial plan was the grey non superwash coned yarn, and some teal leftover sock yarn. Then I decided it needed a bit of magenta, so found some sock yarn in that shade, and also shoved in some bits of merino fibre I had in teals blues and purple. There’s also a teeny bit of leftover handspun in grey and teal in there.

The final fabric off the loom was 5.15 metres long. And very hard to photograph on a windy day.

P1080488

P1080498

After wet finishing, the fabric was about 26 x 475cm. I say ‘about’ because my selvedges weren’t especially neat, so the width varied a little, and the length was very hard to measure cos it was so long!

After a lot of sketching and calculating, I figured out the easiest way to make it into a top. Unfortunately there wasn’t enough fabric for a hood, but I still love it.

P1080515
P1080521
P1080509
P1080523

And because someone asked how I made the pattern, here’s the basic info:

Each piece was zig zagged on both sides of the cut line before being cut, all sewn seams were somewhere between the width of my sewing machine foot and the 10mm guide, depending on how neat my selvedges were. Seams were ironed open between each stage of sewing.

I cut 4 pieces 40cm long, which I then sewed together into a tube for the body.

The remaining length was folded almost in half, with one side a couple of cm longer than the other, and cut. This gave me 2 pieces approximately the same as my arm span.

The longer piece was again cut in half.

The raw edges of this last cut were folded under and stitched to finish the front neck opening.

These two pieces were then joined to the body tube making sure the V was centered. The back strip was joined in the same way, making sure it was all lined up. The top sleeve seam was sewed, leaving a gap 5” either side of the centre for the neck hole. Finally the underarm seams were sewn.

Then I went round and folded under and sewed all remaining raw edges…the collar, the sleeves, and the bottom hem, and folded in and sewed the corners of the top front slit to give the neckline a shape I liked.

It took me about 3 weeks to weave the fabric, and less than 3 hours to sew it. I’m not 100% sure I like the big baggy sleeves, I may well taper them if I find the extra fabric gets in the way, but that’s an easy change to make.

And pretty much as soon as that was off the loom, I was planning the next thing. I did this!

P1080525

Yup, my loom now has 4 harnesses. Adding the extra 2 harnesses was a lot simpler than I expected, but I needed help, partly because there was a screw that was too tight that I couldn’t undo, and partly because it’s a lot easier to hammer a cap onto the end of a rod with someone else holding the far end of the rod to stop it shifting rather than having to do it all myself. Still, it didn’t take long to do.

Then I figured out the easiest way to wind a warp while sitting down:

P1080526

368 ends, and while I did need to take breaks cos my arm got tired, it’s way less tiring than direct warping the rigid heddle on top of the table. Although of course, now I have to actually thread all that onto the loom.

Facing my fears – Ginger Jeans!

I do not like sewing very much. I think about sewing, and my brain image is of me sitting at a sewing machine stitching, and I think ‘oh that’s not so bad, I like that!’. This is true. However I always forget that this accounts for only about 20% of sewing. The rest is ironing and pinning and cutting and playing furniture tetris because my room isn’t quiiite large enough for the table fully extended and the ironing board and space to easily move between them, and I find this part physically exhausting and quite boring, there’s too much stopping and starting to get into a good rhythm with it.

However, this time I am going to persevere with it, as I want some jeans. I find jeans very hard to buy as I have a 12″ difference between my hip and waist measurements, so I end up eventually finding a pair of jeans to fit my hips (which could be anywhere between a size 8 and a 14 depending on brand and cut) and having to ignore the fact that they are too big at the waist and gape horribly at the back.

I’ve been aware recently of the internet hype over Ginger Jeans (well, as much as there CAN be hype over a sewing pattern) and decided to give them a try. The pattern is fairly expensive, but it is SO worth it, and for relative sewing noobs like me it’s a perfect pattern to try as it was also done as a sew-along on the authors blog, so there are extra hints, tips, and photos for bits that are harder to figure out.

I am making the size 12 to fit my hips, and took a couple of inches out of the waistband in two darts before cutting the pattern, and also did a full seat adjustment as explained in the blog post to add extra butt space and hopefully stop the back waistband pulling down when I sit. I added about a centimetre to the back seam, though from having quickly basted and tried them on, I think next time I’ll add two.

While waiting for my fabric to dry I cut and taped the pattern together, then it was time for cutting!

P1080281

The pattern said I would need 2.1m of 60″ fabric for my size. I was only able to buy in 1m increments, so I had to get 3m. On examining it, due to the fact that I’m not making the largest size and the fact that my fabric is actually 62″ wide, I realised I could amend the cutting layout so I can actually get two pairs from the fabric I have. Score.

I cut all the denim, interfacing, and lining. I picked a pretty pink and blue fat quarter for the pocket linings as although they won’t be visible when worn, it looks fun as I am putting them on.

P1080284

The process took longer than anticipated as I had to stop many times to remove the cat from the fabric, or from the ironing board, or from my chair, as well as having to take lots of breaks to stop myself getting too tired. Here is my helper helpfully holding down my pattern instructions so they don’t get lost.

P1080285

And here’s what I’ve got so far…pockets! It’s the first time I’ve done topstitching with a thicker contrasting thread, and the first time I’ve used my serger for curved seams, but it’s going okay so far without any major disasters.

P1080287

P1080292

The topstitching could be neater, especially around curves, but I’m sure I’ll improve with practice, and a few wonky seams are worth it to have jeans that actually fit me!

Preparing for loom arrival!

So provided nothing horrible happens between here and Japan, my loom should be here within the next couple of weeks. I sorted all my ravelry stash and added the colour tags so I can easily sort by colour to remember what yarns I have in various colour families. While doing so, I realised that I don’t have very much cotton at all, pretty much only a load of dishcloth cotton, which is wonderful and makes awesome squishy teatowels, but is fairly limiting as it’s rather fat. So I hunted around the internet for some cheaper cottons for practicing 4 shaft patterns with. I ended up buying this surprise mixed box from yeoman yarns. 4 kilos of cotton for £30 including delivery!

They allow you to have some input in what you get, so I said it was for weaving so I’d prefer mostly finer weights, and that I like natural colours and bright jewel colours, please no pastels.

This is what the postman brought me!

P1080140_medium2

It is all unlabelled, so I have no idea what it is, and many of the items are mill ends or otherwise unrepeatable, so it’s not a great thing to buy if you want to know exactly what you’re getting and be able to order more, but for learning purposes without spending a lot of money, it’s perfect, and I’m really impressed with the great value for money.

In closer detail:
random small cones given as freebie
P1080145_medium2

bright red. very fine. 2 ply, approx 44 wpi, 2 cones, 282g each including cone
P1080146_medium2

raspberry, purple, green, and beige. 2 ply yarn cabled (2 x 2ply) approx 515g including cone, 30wpi
P1080140b_medium2

natural, about fingering weight, 22 wpi, 3 ply, 595g including cone
P1080147_medium2

turquoise, 4 ply, 18 wpi 553 g including cone
P1080148_medium2

natural, singles, thin with thicker slubs, 515g including cone, 30wpi
P1080149_medium2

I also got bored of reading and thinking about weaving, so decided to actually DO some. I got my rigid heddle out with a couple of skeins of wollmeise (campari orange and herzblut), a ball of my very first handspun in coordinating colours for texture, and made these two scarves:

IMG_8762_medium2
IMG_8704_medium2

Fingers crossed the saori loom gets here soon, and that it’s not too hard to assemble, then I’ll be doing all sorts of twills and other fun things soon!

I have too many hobbies (the great unfuckening)

I am getting a new loom in a month or so. It’s a Saori WX60, which is pretty small for a floor loom, but it still required I tidy my craft room to make space to use it in there, as over the winter it had become a dumping ground for xmas presents, clothes, and empty boxes. I managed to get a bag of rubbish, a bag of recycling, and a box of stuff to donate out of there, but it’s still pretty packed full, and I can’t really get rid of anything else because I love all my stuff! I just have too many hobbies. So I thought I’d give you all a quick tour of the room while it’s mostly tidy (but still uncleaned, the vacuum cleaner is rather heavy to carry upstairs, so please ignore the messy floor and the cobwebs).

Firstly this is what you see as you enter the room. Shelves stuffed full with fabric. These will be cleared and all the fabric folded, but it’s a rather long task, so it can wait for a while. There’s a mix of clothing fabric, quilting fabric, old sweaters and shirts to reclaim, and a few bits of handwoven stuff I’ve not found a use for yet. And an interested littlecat.

P1070977

Actually inside the room. Ahhh, much less messy.

P1070980

And working around the room in a clockwise direction: Dressing table area –

P1070985

1. Passap knitting machine. It’s awesome, but takes up a lot of space, so it’s currently disassembled
2. Knitting needles, spindles, blocking wires, pens, and scissors
3. Bits for my current quilting WIPs
4. My desk ‘inbox’ of stuff i need to deal with. Has a jumper in that needs frogging, some pegs from a peg loom, and some mini skeins of sock yarn.
5. random bits and bobs. Lint roller, lens caps, lighting gels sample books.
6. Plastic bags for putting spinning fibre in
7. Zips and small bits of fabric for making doll clothes
8. Sewing things. Threads, feet for the machine, scissors, chalk, rotary cutter etc
9. Blocking mats

Above the dressing table:

P1070986

1. My dad’s old meccano set!
2. Old crappy loom
3. Doll boxes
4. A box of bags. That I don’t really need. But maybe one day I will!
5. The rest of my current quilting WIPs to go with the bits on the desk
6. A bag. With nothing in. But it has owls on.
7. A box of boxes! I culled my cardboard box collection somewhat, but kept a few cos they are useful for spindle WIPs, storing rolags, thrummed knitting WIPs, and probably other things
8. Coned yarn, mostly silk.

Drum carding shelves:

P1070987

1. Strauch drum carder. It is awesome
2. Bag of bags that I do actually use, small foldable project bags
3. Carder stuff, one box with accessories like batt pick, brush, and flick carder, one with angelina and nylon sparkles
4. Dyed merino
5. Stuff that isn’t merino, some dyed, some not, all ready to spin/card
6. More stuff that isn’t merino but in larger quantities, again all ready to spin/card.
7. Cutting mats and rulers

Top of bookcase:

P1070999

Coned yarn, mostly wool

Inside the bookcase:

P1070988

1. Wollmeise Molly
2. Sanguine Gryphon Bugga!
3. Wollmeise Lace
4. Wollmeise sock
5. Other sock yarns
6. Boooooks
7. More sock/lace yarns that aren’t in skeins
8. Ironing board and knitting machine table, that I don’t need for my current machine as it has a stand, but its a really useful narrow folding table.

P1070997

Even more books and mags at the bottom of the bookcase. Mostly handknitting, but a few machine knitting, weaving, spinning, dyeing, and a couple of random ones on other things like basketweaving and home brewing.

Under the table:

P1070989

Loom bag for my Ashford knitter’s loom containing spare heddles, lease sticks, warping post etc, and a huuuge bag of drumcarder waste and leftovers for making fun batts.

On the table:

P1070990

It’s clear! it’s a miracle! Just the sewing machine and a couple of pots of pins/bobbins etc. The table is older than I am, it was our dining table when I was a kid, then got relegated to craft table status, then eventually was given to me.

Yarn cubbies

P1070992

1. Knitting machine bits and bobs
2. Doll clothing and wig making stuff
3. Fibre that is washed but not ready to spin, wool and alpaca mostly
4. More fibre, including 4 colours of Jacob that I combed last year
5. A leather case that I bought at a jumble sale cos it was cool, but never use
6. Long term knitting WIPs that I’ve not worked on for a while
7. Acrylic and mystery (alpaca maybe?) yarn
8. Acrylic
9. Single balls and yarn i have no plans for
10. Sweater quantities
11. Undyed yarn. Sock, lace, and gansey yarn
12. Leftovers, mostly sock weight
13. More sweater quantities, but in various colours for fairisle/stripes
14. Handspun – large skeins
15. More sweater quantities, and a sheep
16. Handspun – samples, small skeins, and leftovers
17 & 18. Fibre, luxury and hand dyed.
19. Super awesome bright light, holding a felted scarf

Small shelves:

P1070993

1. Overlocker
2 & 3. ‘Inboxes’ where I put stuff that I bring into the room before I put it away, at the moment has my swift and ballwinder in, and some socks that need darning. Also used for new yarn that still needs entering into my ravelry stash.
4. Art supplies that haven’t made it to the art cupboard downstairs yet either because there’s no room, I’m too lazy, or I don’t want anyone using my stuff.
5. Iron
6. The only box of crap! random stuff that needs sorting out and putting away, old pens, cables etc
7. Spinning stuff. Bobbins, 2 sets of carders.
8. Spinning and weaving stuff. Standard and jumbo flyer for my wheel, and all this stuff that came with the crappy loom. Such cute mini shuttles!

P1070996

The reason I don’t want people to use my art supplies, they might mess up my colours!
P1070995

In the built in cupboard:

P1070994

1. Enormous cushion pad and bag of fibrefill
2. bag of really really old wips. In crappy yarn. That i will never finish or wear. I will throw them away one day.
3. Curtain fabric left over from my bedroom curtains
4. Tripods and light stands. And an easel
5. Yarn that I was going to destash but the post office is sooo far away and I never know when I’ll be well enough to drive there. So maybe I will weave it instead.
6. Random odd balls of yarn with no projects planned, but too nice to get rid of. I will use them eventually.
7. More photography stuff, lights and cables and reflectors and things.

And that is the tour of my craft room and all my things! There are also many other things not shown as they dont live in there. My knitters loom and a box of kitchen cotton live under my bed, my current knitting WIPs and my interchangeable needles live in my bedroom, my spinning wheel, wool combs and niddy noddy live in the dining room, and my dyepots, dyes and other related stuff live in the utility room. Oh and there are more raw fleeces than I can count in the garage/loft. SO MANY HOBBIES AND SO MUCH STUFFFFF. But I don’t think I’ve reached the point yet where my stash will last longer than I do.

Tomatoes 2015!

Rather than trying to remember next year which tomatoes we liked best, I decided to actually write it down! Most of these are heirloom varieties from The Real Seed Catalogue (who I can’t recommend enough by the way), a few are just from the depths of the seed stash. They were grown in the greenhouse unless otherwise noted, and were mostly neglected. We generally manage to water when needed, but miss a few shoots that should be pinched out, and often forget to feed as often as we should.

P1070735

1. Garden Pearl. Teeny tiny cherry tomato, great for hanging baskets. Super prolific, but not especially early.
2. Latah. Bush type. Grown outside. very very early, very prolific, slightly bumpy tomatoes, fairly small. J’s favourite for flavour.
3. Grushovka. Bush type. Grown outside. Moderately early. Large pink heart shaped tomatoes with firm flesh. Very yummy. Fruit is very heavy and the plant doesn’t support it well, so needs protecting from slugs. Surprising amount of fruit from a small plant.
4. Costoluto. Great plum tomato. Not especially early.
5. Green Zebra. Pretty stripey green/yellow when ripe. Not hugely prolific, but very tasty.
6. Skykomish. Well, it’s a tomato. Not hugely exciting, but yellow is pretty I guess. Tastes nice, but nothing mindblowing. Moderately late, moderately prolific.
7. Amish Paste. Very prolific, mid season, sizes from medium to enormous. Kind of a pain in the ass cos there are just too many folds and the bit at the bottom where the flower joins often makes a big black bit that needs cutting out. Taste is fine, good for sauces, but we’ve grown it for 3 years now and it’s probably too much of a pain to bother growing again.
8. Rose De Berne. Very prolific, mid season, pretty large pink tomatoes. Taste lovely, probably my favourite this year.
9. Black Cherry. Very prolific, mid season but go on and on for ever, pretty purple cherry tomatoes. Only grew them cos we had a few seeds left over, but I’m glad I did.

MSD onesie pattern

Yeah, so I am a baaad blogger. But rather than rectify that by talking about all the things I’ve done in the months since my last post, I’m just gonna forget about it and get on with explaining how to make a onesie for a MSD (42cmish) BJD. My doll is a ‘vivi’ by Xinmeng, purchased from Mirodoll.

IMG_6138 IMG_6140

This pattern isn’t for complete beginners. Not really because it’s hard, although there are a couple of slightly fiddly curved seams, and putting in a zipper needs a bit of practice if you’re not done it before, but mostly because I have never written a pattern before and don’t really know what I’m doing, so a bit of background sewing knowledge will be helpful so you can understand what I’m talking about!

Things you will need:

Old t-shirt, or similar fabric
Matching thread
Zipper long enough to reach from your dolls crotch to an inch or so above the top of her head (longer is fine, it is trimmed to fit) I believe I used a 10″ zip
Pins
Sewing machine with regular and zipper foot
Iron

Pattern notes:

The pattern is made to be sewn on a machine, so there is a 1/4″ seam allowance, you can reduce this if you’d prefer to hand sew. The outer line on the pattern is the one you should cut around, the inner line is the size of the piece without seam allowance, if you’d prefer to draw your own. Due to the software I used to make it, the edges are rounded, you don’t need to cut them like this, square corners are fine.

Unless otherwise specified, all seams are to be sewn with right sides facing, and pressed open.

The pattern covers two sheets of A4 size paper. If you live in a country where other sizes are standard, then print it at 100% and allow cropping, hopefully nothing useful will be cropped!

Get the pattern by clicking on each of the two below images, then click more actions > download/all sizes and choose the ‘original’ size.

pattern2 pattern1

Instructions

Print out the pattern, and tape it together, making sure the lines for the legs match up

P1050503

Roughly cut out the pattern pieces and lay them out on your ironed t-shirt. If you are using fabric, then fold it half, each pattern piece is meant to make two symmetrical pieces. Cut another pattern piece that is a little wider than your zipper, and 4″ long.

P1050505

Pin your pattern pieces to the t-shirt, and cut them out, cutting through both layers of fabric. You will end up with 10 pieces, 2 backs, 2 fronts, 2 hoods, 2 sleeves, and 2 zipper tabs.

P1050507

With right sides facing, pin the two hood pieces together, and sew around the curved top/back seam.

With right sides facing, pin the two back pieces together, and sew along the seam from the crotch to the top of the neck.

Press seams open. It’s a bit fiddly to do the inside of the hood, but as long as the top and back part are flattened, the middle doesn’t matter too much.

P1050508

Pin the front pieces to the joined back, and sew along the shoulder seams. The lines you should sew are marked below.

P1050510

After ironing these seams flat, pin the hood into place. Line up the centre hood seam with the centre back seam, and pin in place around to the front. Make sure you pin the shoulder seams flat. Sew this seam.

P1050511

You should now have a crazy robe looking thing!

P1050512

Take your zipper, and cut off the bottom, just below the stopper

P1050513

Line up the zipper with your onesie, starting at the crotch, and cut off the top level with the top of the hood (I actually cut mine a bit shorter, but if I did it again I’d err on the side of longer so the zip comes closer to the top of the hood)

P1050515

Take your zipper tabs and fold over 1/4″ on each end, and iron.

P1050516

Fold them in half, and iron again

P1050517

Put the zipper inside the tab, half an inch or so deep, pin, and sew across to attach the zipper to the tab. I forgot to take a photo of this, but it’s relatively simple. When this is done, cut across the fold line at the bottom, open it up, and trim the end of the zipper.

P1050519

Repeat for the top of the zipper, you will have to do this with the zip open to stop the pull getting in the way of the sewing machine foot, so make sure you pin carefully.

With the right side of the zip facing the right side of one front, making sure the zip is the right way up, pin in place, deciding how much tab you want at the top and bottom (excess can be trimmed after sewing).

P1050520

Using a needle and waste thread, baste the zipper in place (some people can get away without this step, and sew a zip in that is just pinned in place. I am not one of those people)

P1050521

Put the zipper foot on your machine, and sew the zip in. Start with the zip in one position, then stop half way through (leave the needle in the fabric and lift the foot) and slide the pull past, so it doesn’t get in the way. When you sew the tab on each end, sew a diagonal line from the line of the zipper stitching to the edge (so a triangle will be visible on the front when finished).

Repeat for the other size of the zipper.

Press, and top stitch all the way round the zip.

P1050523

Put the regular foot back on your machine, and prepare to sew the arms. Pinning them is a little fiddly, so just take your time

P1050524

When both sleeves are sewn in, fold over the ends of each arm and leg 1/4″, iron into place, and sew

P1050525

From here, I got so excited to be on the home straight, I forgot to take any more photos. It’s pretty simple though.

Make sure your zipper is open, or you won’t be able to turn it the right way out at the end!

Line up all the edges, pin, and sew. There are three seams: wrist to ankle on each side, and the inside legs . Nothing complicated here, just nice straight lines.

When you’re done, turn it inside out and give it a quick press, then try it on your doll!

IMG_6126IMG_6124IMG_6128

Harvest time!

Everything is growing! Today I picked the first of the beans, along with all this (and also a few raspberries and blueberries, which I do every morning, and which rarely make it as far as the kitchen. Yummy!)

veggies

The heatwave finally broke and it’s been raining a lot, so everything is growing like crazy, I’ve been getting about that much veg every few days, though the peas are now coming to an end, just in time for the beans to really get going.

The herbs are all growing nicely, I need to take out last year’s parsley cos it’s going to seed, but I’ve not got anything to replace it with yet, so it can stay for a while.
herbs

Mum and dad brought the swing seat round, so i have somewhere nice to sit outdoors now
seat

Seee, lots of growth!
veggies1

When I got these pics, it was the first hot sun for a while, and the chickens were taking full advantage of it, lying around with their wings out sunbathing

sunbathing

Aaaand, I made a basket a couple of weeks ago. I keep forgetting to take bags when i go shopping, which i normally solved by keeping a load in the car, but they’d still all migrate to the kitchen and I’d run out, so I made a basket which i could leave at the front door and grab as I was on my way out. I’ve forgotten it a couple of times, but it’s had a higher success rate than remembering to take bags. And it’s pretty!

basket

And another progress pic, I love looking at these and seeing how much stuff has grown in a relatively short period of time

gardenprogress

Hooping, progress and injury report.

So, my hoop arrived yesterday. On picking it up, I had an instant reminder of when I started spinning. My first yarn was spun on a homemade CD spindle, where the CD was fixed to the shaft with a bit of polystyrene and the cap of an old film cannister, and using a lump of fleece I found in the field up the road, combed with a cat comb. It was yarn, and it didn’t even look too bad as far as beginner yarns go, and I mostly got the hang of drafting, so i didn’t need to park and draft, but still, it was DIFFICULT. It was hard enough trying to get my body to co-ordinate all these new movements without using crappy equipment, and the fact that my shoulder was still very painful a lot of the time didn’t help. When I first got a wheel, it came with some wool tops, and when I first tried spinning them on the wheel, it was like magic, it was just SO EASY. Like all of the things I’d been fighting against with the spindle and old wool had just gone away, and I was instantly drafting and twisting evenly.

And the hoop was like that. As soon as I picked it up and started playing with it on my waist, it didn’t need so much effort or concentration, I could move around without it falling down, and it felt a lot more natural.

Of course, I still have a long way to go before I am any good at it, but having a proper hoop has made such a difference.

And here’s another video for me to look back at some day.

Currently I can waist hoop in an anticlockwise direction with minimal effort, I can do corkscrews successfully about half the time, and move the hoop from my waist to my hips and back most of the time, though I need to work more on pushing back so it stays on my hips and doesn’t move to my waist without me wanting it to. I can’t do any form of chest, thigh, or shoulder hooping.

Oh, and yes, injuries. I’ve smacked myself in the head with it a couple of times with no permanent damage, but I am currently sporting a nice bruise on the back of my right hand between my thumb and forefinger. It’s pretty swollen, but hasn’t started going funny colours yet, so that fun will probably start tomorrow. I’ve been trying to work around it by using the hoop higher up on my fingers, which mostly works, but still, ouchie! I also have a bruise from a few days ago on my calf, but that one is just really ugly rather than painful.

Now I’m mostly just annoyed with my body for not being as fit as I want, and for getting tired really easily. I know I’m doing soooo much better than this time last year, but still, i wanna plaaayyyy, and it’s annoying to have to make myself stop and sit down every couple of minutes.

Bandwagon jumping

So, the internet was all ‘hey, people with CFS will feel better if they do exercise’, and i was all ‘stfu internet, how can i exercise if i feel like i’m gonna faint all the time?’.

But then I realised I no longer feel faint ALL the time, and have actually been feeling pretty well this spring. Okay, so I’m still sleeping at least 12 hours a day and I still need help with certain household tasks, and still have the odd few days in bed when i overdo it,  but I’ve been generally okay for a month or so. So I decided to do some exercise. I started off with some easy yoga poses. Well, easy in the sense that they don’t require me to lift my whole bodyweight, but still with some difficult stretches, and I’ve been trying to strengthen my arms with little girly weights. But i needed to find something that gets my heart pumping that isn’t too strenuous, running or aerobics is too much for me….so I decided I wanted to try hooping. I was pretty good as a kid, and I had a crappy hoop in the garage for some reason, so i got it out and started to play. I couldn’t do it. It’s only crotch height, and reaallly light, and the interwebs told me i needed something at least navel height as a beginner. I messed around with it on my arms for a bit, then figured that if I can’t make it bigger, at least I can make it heavier, so I took it apart and filled it with water, and yay, I could do it!!!

So I made this video in hopes that I can look back in a few months and see some improvement!

My dad is getting me a pretty 40″ hoop for my birthday, so it’ll be easier and slower and hopefully won’t be as tiring, then maybe I’ll even be able to learn a few tricks!