I was asked to write a tutorial on how to use a drum carder. This is a huge topic, so in this first post I will go over the basics. Future posts will cover carding raw fleece, and blending commercially prepped fibres, as well as how to clean your carder.
First, the basics. What is a drum carder?
A drum carder is a machine which is used to prepare fibre for spinning. It has two drums, one small one (sometimes called a licker-in) which helps guide in the fibre, and then a large one, which the fibre ends up wrapped around. When the larger drum is full, the fibre is removed, and the resulting chunk of smooth fibre is called a batt. There are several ways to spin from batts, and I will cover those in future tutorials.
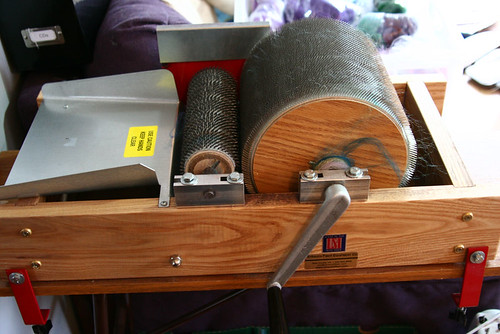
There are several different makes of drum carder, I have a Strauch carder, which can be seen here. I chose the Stauch because it has finer card cloth than the others available, meaning it can be used for carding finer fibres, because the licker in cloth is of a unique design that doesn’t trap the fibre, and because it is chain rather than belt driven, meaning it will hopefully last as long as I do.
My carder (pre-cleaning as I took the pic to use in my cleaning tutorial):
Tools needed to go with a carder
If your carder doesn’t come with clamps to attach it to the table, then these are a very worthwhile investment to stop it moving around as you card and while you’re removing the batt. Here is a photo of the other tools I use with my carder:
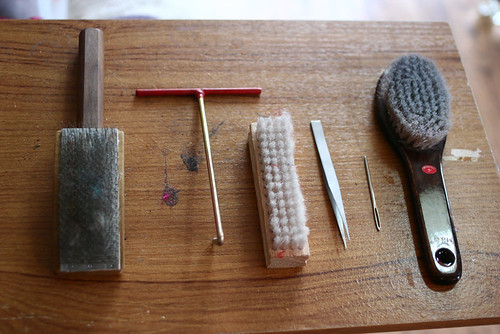
The three on the left came with the carder. They are:
Flick carder. Can be used for opening locks of raw fleece before carding, and also for cleaning the drum. I only use it for the latter, I prefer to open locks on a hand carder laid flat on my knee. To use it to clean the drum, hold it against the large drum while turning the handle the opposite way you’d turn when making batts (normally anticlockwise). Don’t move the flick carder from side to side while the drum is turning, do one rotation of the drum with it in one position, then stop and move it over.
Knuckle saving batt pick. This is used to get the batt off the carder. At one place on the drum there are no teeth. When the carder is full, you use this tool along the toothless part of the carder to separate the fibres, an inch or so at a time, until the batt is no longer joined.
Brush. This small brush looks a little like a nailbrush, and is used for cleaning the licker in drum. Due to the design of the cloth on the Strauch, the drum doesn’t get covered in fibre like some other models, but sari silk and angelina especially seem to want to get trapped on it, so brushing with this brush helps free them.
The other tools are my own, and I find they help considerably with using/cleaning the carder.
Long thin forceps. Even after cleaning the drum with the flick carder, there are sometimes a few stray fibres which remain. These forceps are thin enough to get inbetween the teeth to pick out any fibre left over after cleaning. They are also useful for pulling off any fibres which get wrapped around the axles of the drums. Note that while they are thin, the tips are not sharp, so they don’t damage the cloth.
Large needle. I use this to lift off the fibre from the flick carder after cleaning the drum.
Bristle hairbrush. I couldn’t afford a carder with a brush attachement, so I run this over the drum between layers to squish down the fibres and enable the carder to take more fibre in one go.
How to use a carder, the basics
Most carders have a tray onto which you place the fibre. As the handle is turned, the licker in drum pulls the fibre in under the drum, and deposits it on the larger drum. The large drum turns faster than the smaller one (mine turns 5 times faster), so the fibres are pulled apart as they are deposited onto the drum, smoothing them out.
Here are a few tips which will help you get the best from your carder:
– Don’t put too much fibre into the feed tray at once. You should just be able to see the tray through the fibre. If you put too much on the handle will be hard to turn and the fibres may tear or get caught between the drums. If you are carding commerically prepped roving, you can use as long a length of roving as you like, just make sure the piece is thin enough that the carder runs smoothly.
– Guide the fibre in with your hand. Place your hand on top of the fibre in the feed tray and gently hold it in place, moving your hand as the carder pulls it in. Don’t pull back on the fibre, this will encourage it to wrap around the smaller drum, instead just gently guide it to keep it pulling in smoothly.
– Turn the handle slowly. After a little use you will be able to feel how fast you can turn it and still have the fibres deposited smoothly on the drum. Turning it too fast will be harder work, and may rip the fibres, causing nepps (lumps) in your batt.
– If your carder doesn’t have a brush attachment, get a bristle hairbrush and run this over the drum while turning it between layers. This will help compress the fibre and allow you to get more on the drum. This is especially useful with very fine fibres like angora, which want to fly away all over the place and don’t embed into the teeth on the drum easily by themselves.
– Don’t allow the fibre to ‘fall off’ the edge of the large drum and wrap around the axles or anywhere else on the carder, as this may damage it. It happens to everyone sometimes, but try and move the fibre as soon as it starts to do this, and pull it off the axle immediately.
– When removing the batt, use your doffing tool (or batt pick, or whatever your one is called) to free up just an inch or so of fibres at a time, if you try to do too much you’ll find it very difficult, and you may rip the fibres. Once the batt is separated, take the end furthest from the small drum, and roll the batt up, keeping your hands close to the drum so more of the stray fibres are kept within the batt. The drum will move by itself as you carry on rolling, until your batt is freed.
That is all I can think of at the moment, if you have any questions, please leave a comment and I will update with answers.
Hi vampy and ta for the tutorial, just what I was looking for as my new (second hand) carder didn’t come with a destruction book! Now I do have one question: the two drums on my carder are adjustable. How far apart should they be?
thanks in anticipation…
Hi vampy!
Your tutorial is really great and I would very much like to translate it to german, because there are people at the spinning forum i am a member which aren’t able to understand english.
I’m not sure of it, but it is possible that the translated version could be integrated in the tutorial section of the page (with credits to you) and would therefore like to ask if that would be ok with you?
Here is the forum (in german) if you want to have a look.
Thanks in advance and keep up with the great work!
Regards,
Veronika
Sorry, forgot to post the site.
I use a wallpaper brush to smooth the fibers onto the drum. It is wide and covers the whole drum, and the bristles are soft.